finding ways to use cooking, crafts, and hospitality to be a blessing for others
Showing posts with label gluten free. Show all posts

Saturday, September 4

Granola Bars

I love these granola bars! They are thick and chewy and a great on-the-go breakfast!
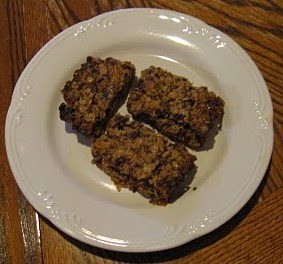


GRANOLA BARS
This recipe is adapted from a King’s Arthur Flour recipe.

Note
This is a very flexible recipe. You can add any variety of fruits, nuts, or seeds to it.

Ingredients
1 2/3 cups quick rolled oats (or opt to use gluten free oats)
1/3 cup quick rolled oats, processed till finely ground in a food processor or blender
1/2 to 3/4 cup sugar
1/2 teaspoon salt
1/4 teaspoon ground cinnamon (optional)
2-3 cups dried fruits and nuts
1/3 cup peanut butter or almond butter
1 teaspoon vanilla extract (optional)
6 Tablespoons melted butter
1/4 cup honey, maple syrup or corn syrup
2 Tablespoons light corn syrup
1 Tablespoon water

Suggestions for fruit/nuts to put into recipe
Dried Fruit: cranberries, cherries, apricots, apples
Nuts: pecans, walnuts
Seeds: sunflower seeds, sesame seeds
Powders: wheat germ
Other: coconut, chocolate chips, peanut butter chips

Directions

Preheat the oven to 350°F. Line an 8x8x2 pan with parchment paper, allowing it to go up the opposing sides. Lightly grease the parchment paper and the exposed pan, or coat with a non-stick spray.

Stir together all the dry ingredients, including the fruit and nuts. In a separate bowl, whisk together the vanilla, melted butter or oil, liquid sweeteners and water. Toss the wet ingredients with the dry (and peanut butter, if you’re using it) until the mixture is evenly crumbly.

Spread in the prepared pan, pressing firmly to ensure the granola is molded to the shape of the pan. (A piece of plastic wrap can help with this, as you press down on the back of it.)

Bake the bars for 30-40 minutes, until they’re brown around the edges. They may seem under-baked, but do not worry, they’ll set completely once completely cool. Cool the bars in their pan completely on a cooling rack. Then, chill in the freezer for about 20 minutes. Use a serrated knife to cut the bars into squares. (Chilling in the freezer helps to further set the bars and aid in the process of cutting them without creating crumbly bars.)

To store, wrap the bars individually in plastic or stack them in an airtight container. In humid weather, it’s best to store bars in the refrigerator. They also freeze well.

Saturday, July 31

Flavorful Homemade Pizza Crust

Parade of Pizzas: Day 4
homemade crust for baked or fried/large or mini pizzas


I was introduced to this recipe by my mother-in-law. She is an excellent cook! It comes from the King Arthur Flour Baker's Companion cookbook. King Arthur Flour has a great catalog of baking supplies and they have a line of cookbooks.

This pizza dough requires more time to make than the recipe I posted last week. But it is versatile, delicious and worth the extra time. Plus, you can make-and-bake it day of, make it now and bake it days later. It can be made gluten-free and can be shaped into 2 large pizzas or several palm-sized pizzas.

When I made it with my husband's family we shaped it into mini-sized pizzas, baked the dough, topped the dough, and baked it again. We also fried some on the mini pizzas and topped them just prior to serving. We like it both ways, but love it fried!

NOW OR LATER PIZZA
This recipe is adapted from the King Arthur Flour Baker’s Companion Cookbook.

Ingredients
3 cups flour (use gluten-free flour if desired)
1 teaspoon instant yeast
1 1/4 teaspoons salt
2 Tablespoons olive oil
1 cup + 2 Tablespoons to 1 1/4 cups lukewarm water

Directions
Mix and knead together all of the dough ingredients, by hand, mixer or bread machine, till you’ve created a smooth, soft dough. Don’t over-knead the dough; it should hold together, but can still look fairly rough on the surface.

Allow the dough to rise, covered, for 45 minutes; then refrigerate it for 4 hours (or up to 36 hours); this step will develop the crust’s flavor. It'll continue to rise in the fridge, so make sure it's in a big enough bowl.

For 2 large pizzas, divide the dough in half. Working with one piece of dough at a time, pick it up and stretch it into the shape desired. For a large thin-crust pizza, make a 12-inch round. For thick-crust, make a 9-inch round.For mini-pizzas, divide the dough into clumps large enough to stretch into a thin 3-inch pizza.

Baked Pizza
Cover the dough, and let it rest while preheating the oven to 450 degrees. After 30 minutes, transfer the pizza dough onto a parchment-lined baking sheet or a hot oven stone. Bake for 6-8 minutes.

To enjoy the pizza NOW
Top it with your favorite toppings and return to oven to bake for 8 minutes. You desire a golden crust and bubbly cheese.

To enjoy the pizza LATER
Allow the untopped crusts to cool, wrap them in plastic wrap, and store at room temperature for 2 or 3 days. Refrigerate for up to 5 days; or freeze for up to 4 weeks.

When you’re ready to serve, remove the crusts from the refrigerator/freezer. While they warm to room temperature, preheat the oven to 450 degrees. Top it with your favorite toppings and return to oven to bake for 8 minutes. You desire a golden crust and bubbly cheese.

Topping Suggestions
marinara sauce, mozzarella cheese, pepperoni, hamburger, bacon, sausage, chopped pineapple, assorted vegetables (roasted onions, peppers, olives, mushrooms, zucchini)

Fried Pizza
Shape dough into 3-inch rounds. Drop rounds, a few at a time, into hot oil. I like using a fry daddy. After 1 1/2 minutes, remove the rounds with tongs and cool on a paper napkin lined plate. After frying all mini-pizzas, stack onto a serving platter and serve with assorted toppings available for people to customize their pizza!

Topping Suggestions
cold marinara sauce, cold pesto, feta cheese, chopped olives
Yields 2 9-12 inch pizzas or several mini-pizzas.